Create a Free Private NuGet Server with Continuous Deployment using VSTS
In the last post we looked into shared libraries in .NET Core and concluded that using NuGet packages is the preferred solution for distribution to multiple applications. This post shows how to use Visual Studio Team Services (VSTS) to set up a continuous deployment pipeline for your internal libraries to publish them to a private secure NuGet server.
Signing up to VSTS
If you don't already have a VSTS account, you can sign up for free in just a couple of minutes:
-
Visit visualstudio.com/team-services and click the free account link.
-
Sign in with your Microsoft account.
-
Choose a unique account name (subdomain) for your account.
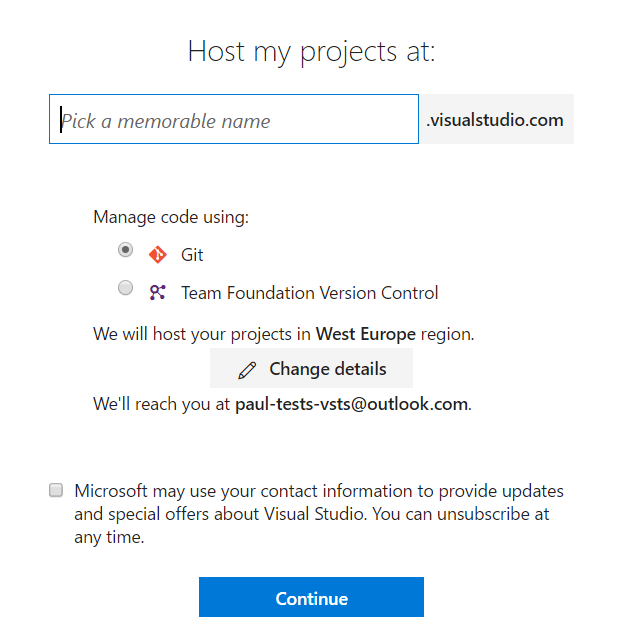
Wait a few seconds and you should now have your own VSTS account.
Creating the Code Repository
There are various ways of splitting up VSTS projects and Git repositories and your choices will be affected by your organisation's size and requirements. I am not a fan of huge repositories containing numerous projects so we will structure our account accordingly. We are going to use a single VSTS project containing multiple Git repositories (one for each library).
Click on the code tab in the top menu and you will be taken to the default project code repository. We will not be using this so it can be deleted if you wish. Instead, we'll create a new code repository just for our library.
It is not very obvious how to create additional repositories. To do so, you click the project name drop-down in the second level menu:
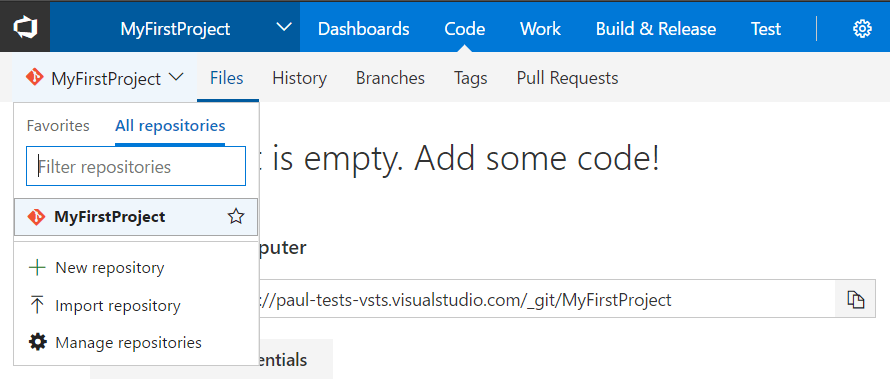
Follow the prompts to create a new repository for your library code. Obviously once created, you will find this repository empty so the next step is to push the library code from your local machine.
Adding code to our repository from Visual Studio
Out of the box Git integration in Visual Studio is very good and improving all the time but if you prefer the command line then I am going to assume you know how to configure and push to a remote repo so you can move on to the next section.
If your project does not have any existing source control, Click File | "Add To Source Control" and a second or so later, all the necessary files in your project will be committed to a new local git repo.
To upload the code to VSTS, we need to link the VSTS remote repository with our local Git repository and then sync them. This is done using use the Team Explorer tab
If your Visual Studio is linked to the Microsoft account you used to sign up for VSTS then you can choose the Push to Visual Studio Team Services option. As an alternative, you can choose the Push to Remote Repository option and manually enter the remote repository URL displayed on the empty VSTS code repository page.
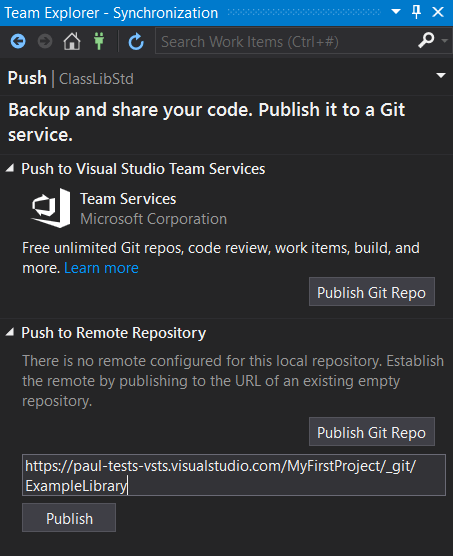
Then click sync and your project files will be uploaded to VSTS.
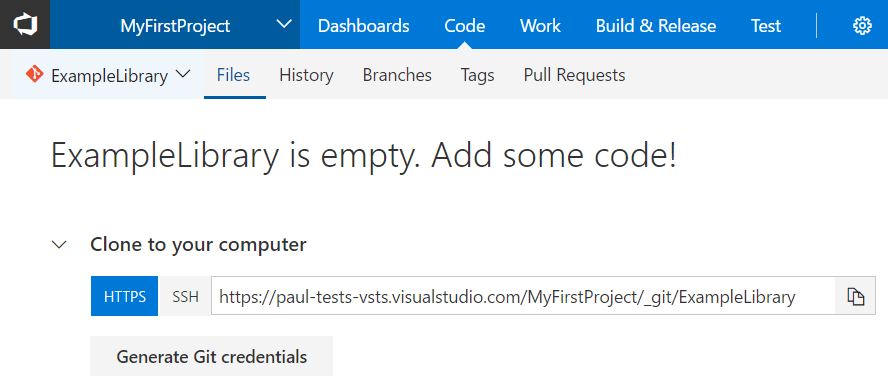
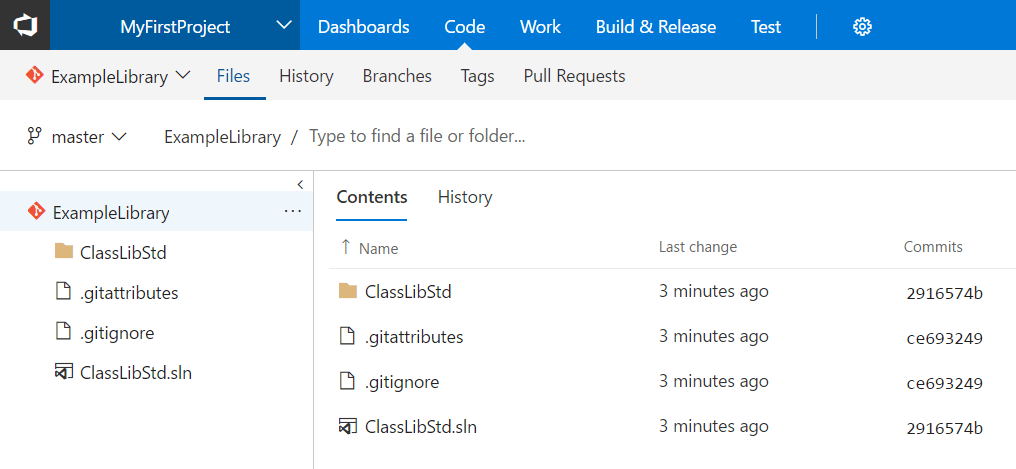
Now if we refresh the VSTS code page, we should see our newly uploaded code:
Building
Back in VSTS, click on the top level Build & Release tab and then click the new definition button. Choose the ASP.NET Core build template.
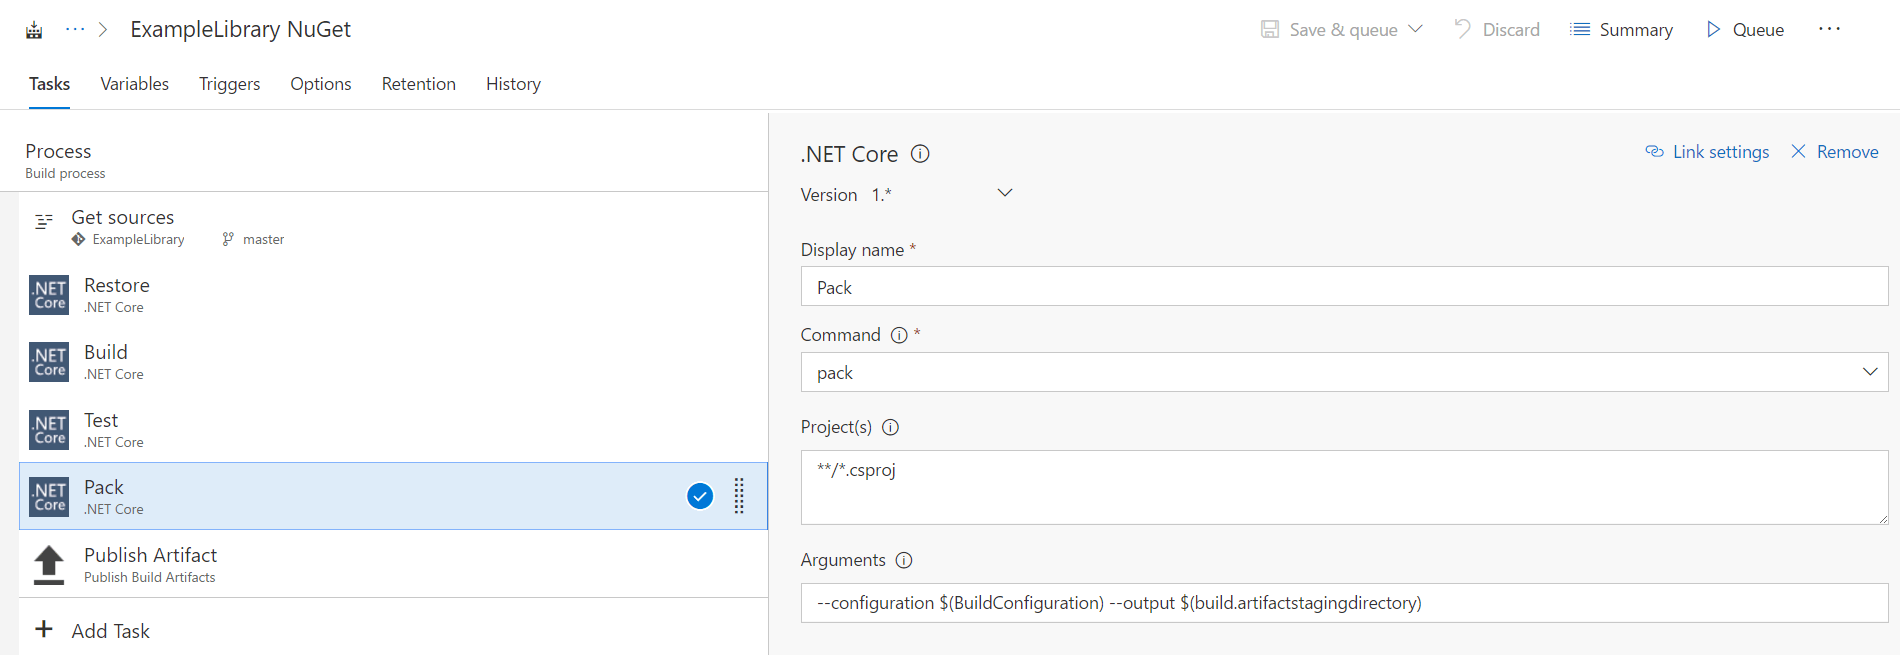
Most of the default settings are fine for our needs but pay attention to the following:
- Give the build a proper name.
- Make sure that the "Get sources" step is pointing at the correct repository.
- Replace the publish step with a pack step as shown below.
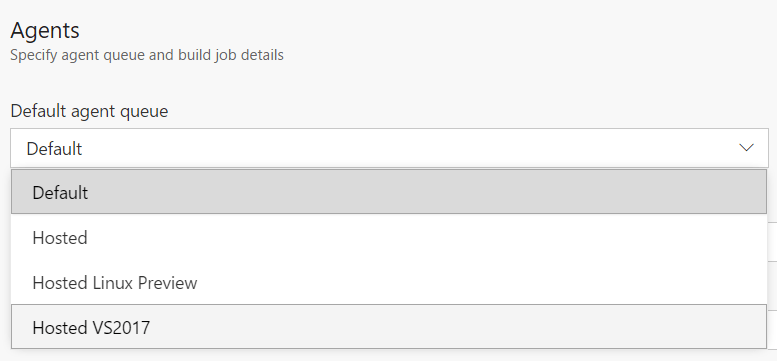
Changing the build agent
To avoid build errors, you must change the default agent queue on the options tab to use Hosted VS2017:
Enabling Continuous Integration
We want a build to be triggered on every commit. To configure this, go to the triggers tab and enable Continuous Integration.
Queuing the first build
When you have finished your configuration, choose Save & queue in the top right of the screen and your first build will be queued. You generally do not need to wait more than a minute for your build to reach the front of the queue and begin. If you navigate back to the main builds page, you can see the status of the build and even drill-down and see the output of individual commands. This can be very useful when debugging a failed build.
If everything has gone to plan, you should find that your build was successful and a NuGet artifact has been created. Before we look at how to deploy the NuGet artifact to our package feed, we obviously need to create the feed and that is what we will look at next.
Creating the NuGet Feed
Background
There are a number of options for hosting your packages. If your package is public then NuGet.org is the obvious choice. For private packages, you can host your own NuGet server easily enough but configuring (read-access) security requires some work. MyGet.org is another choice but for private feeds, there is a small cost. VSTS currently provides free secure private feeds for up to 5 users and is ideal for individuals and smaller teams.
Unfortunately the ability to create your own NuGet feed in VSTS isn't as easy as it could be.
Package feeds are a Microsoft-written extension to VSTS and in my opinion the install page does not make it clear enough that it is completely free for up to 5 users. There is more info here but to summarise, signing up for a 30 day trial gives all users unlimited access. After this time, all VS enterprise accounts plus up to 5 other accounts can access the package feed.
Installing the package feed extension
Visit https://marketplace.visualstudio.com/items?itemName=ms.feed, click the start trial button and confirm your choice. Wait for the dialog to complete and package management will be installed.
Creating the package feed
Under the Build & release tab, you should now find an extra choice 'Packages'. Select this and then click the new feed button
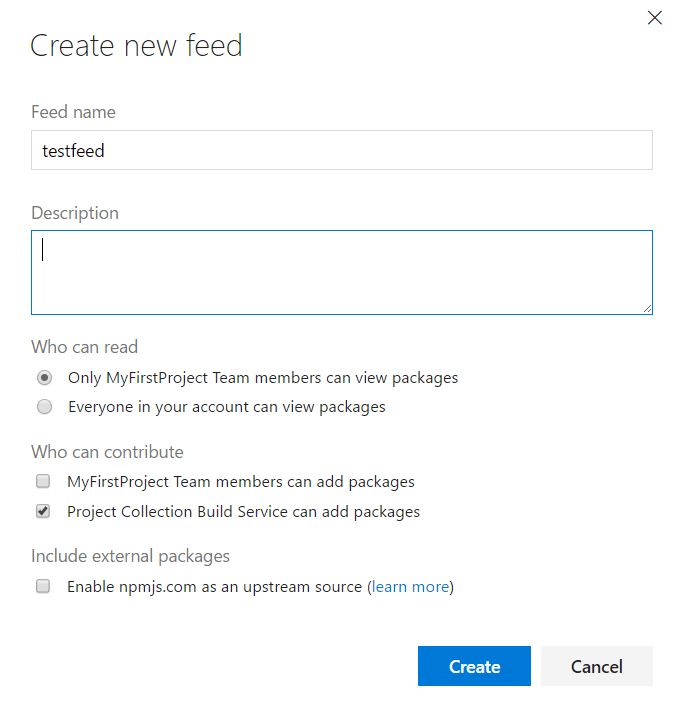
Fill out the form and click Create. Once it has completed, you can click the Connect to feed button to obtain your feed URL. You will need this later so keep it safe.
The URL takes the format:
https://{account name}-vsts.pkgs.visualstudio.com/_packaging/{feed name}/nuget/v3/index.json
Package feed permissions
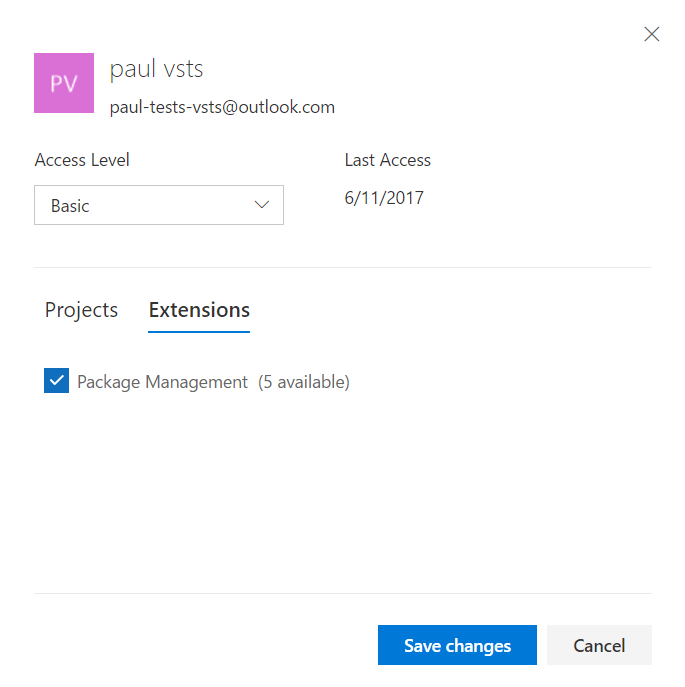
Your VSTS package feed is private. To allow access to the feed, we need to give the Package Management permission to all users who need access.
Navigate to the VSTS home page, click the ... and select users. Now you can select each user in turn, click the extensions tab and check Package Management.
Note that there are two versions of the users page so if you have not opted in to the new version, your page may look slightly different.
Releasing our NuGet Package
If you have been following along then by this stage you should have:
- A VSTS account
- A VSTS project with a git repository containing your library code
- A successful build
- An empty package feed
- One or more users with Package Management permissions.
The final VSTS step is to create a release which copies the NuGet artifact to our package feed. Thankfully this is very simple.
Navigate to the Releases section under the top level Build & Release tab and click the new definition button. We'll use the empty release definition template.
On the next screen, your project and source should already be selected but for subsequent libraries, you will need to choose the source. We want to automatically deploy to our package feed on every build so we will check the Continuous deployment option.
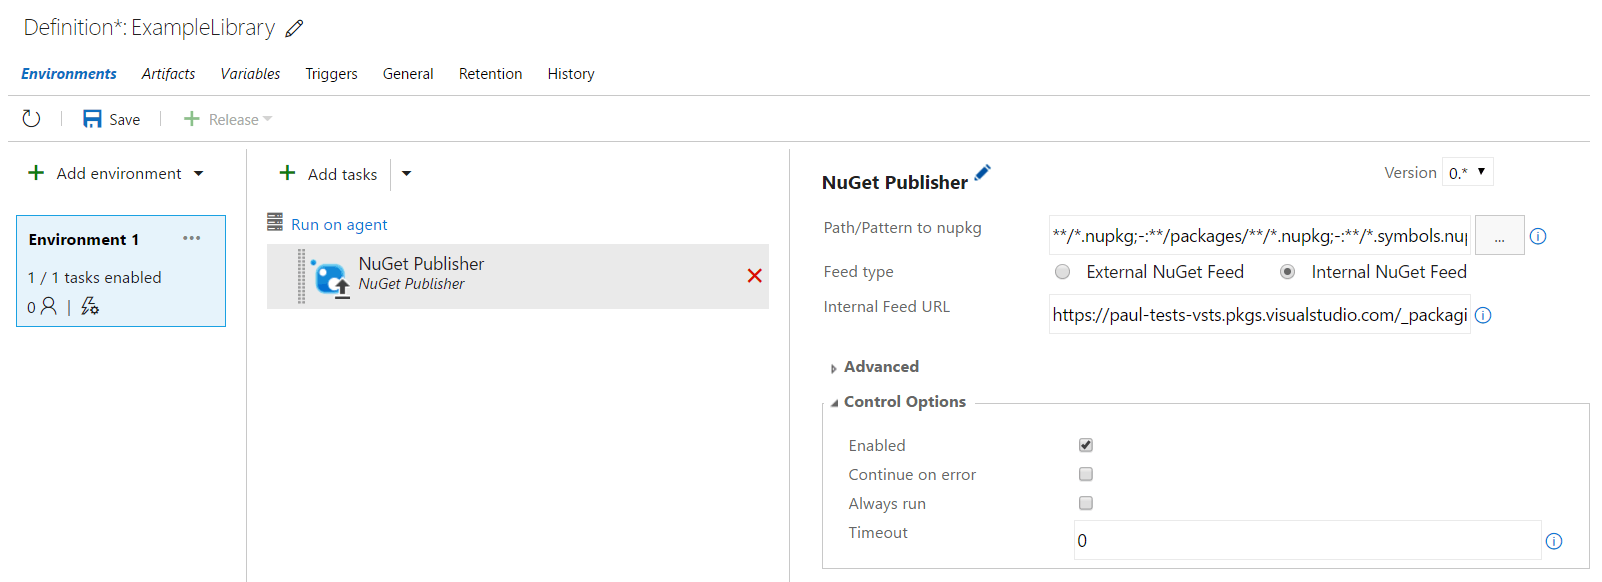
Give the release a meaningful name and add the NuGet publisher task to the release definition. Choose Internal NuGet Feed and enter the Package URL that we recorded from earlier.
You can now save the release definition and create a new release. If everything has gone to plan, a little while later the release should complete successfully and if you check the packages tab from earlier, you'll find your package is now in the feed.
Using our private package feed from Visual Studio
Now that we have our NuGet package being automatically deployed to our private NuGet server, we can look at how to reference our private NuGet packages in our projects. We mentioned last time that although you can add a new package source to Visual Studio, it is better to create a NuGet.config file at the same level as your sln file. This will automatically add the feed for all users. A basic configurations looks like:
<?xml version="1.0" encoding="utf-8"?>
<configuration>
  <packageSources>
    <add key="TestFeed" value="https://paul-tests-vsts.pkgs.visualstudio.com/_packaging/testfeed/nuget/v3/index.json" />
  </packageSources>
</configuration>
This will result in a prompt to sign in when you try and access the feed which is probably the most secure method.
As an alternative, you can create a personal access token and embed this token in the NuGet.config. To do this, click on your VSTS avatar in the top menu (right-hand side) and select security in the drop-down. You can then add a token with the relevant scopes i.e. Packaging (read). Note down the token and use it when creating your NuGet.config:
<?xml version="1.0" encoding="utf-8"?>
<configuration>
  <packageSources>
    <add key="TestFeed" value="https://paul-tests-vsts.pkgs.visualstudio.com/_packaging/testfeed/nuget/v3/index.json" />
  </packageSources>
  <packageSourceCredentials>
    <TestFeed>
      <add key="Username" value="unused" />
      <add key="ClearTextPassword" value="{token}" />
    </TestFeed>
  </packageSourceCredentials>
</configuration>
Note that the Username element must be present although the value is not important.
Conclusion
This post showed how to configure VSTS for your private shared library projects. We explained how to set up a private NuGet feed and how to automatically create a NuGet package on every commit. We then looked at how to automatically deploy the NuGet artifact to our package feed. Finally we showed how to configure applications to allow access to our secure package feed.
If you are an individual or startup, you might be interested to know that Visual Studio Team Services (including the package management add-in) is free for up to 5 users and includes 240 minutes of build time without any charge.
Comments
Be the first person to comment on this article.
About

DevTrends is owned by Paul Hiles who has over 20 years of experience developing Microsoft based applications. More »
Contact
Email me at paul@devtrendsnospam.co.uk


Search
Latest Blog Posts
- Avoid AsNoTracking and Include when querying using Entity Framework in ASP.NET
- Announcing ConfigurationExtensions - bind config to C# records and classes with constructors
- Fast Free Geolocation in .NET with freegeoip.net
- 3 Ways To Avoid An Anemic Domain Model In Entity Framework
- Installing the ASP.NET Core 2.0 runtime store on Linux
- Dependency Injection in action filters in ASP.NET Core
- Custom response caching in ASP.NET Core (with cache invalidation)
- A guide to caching in ASP.NET Core
- Hashing, Encryption and Random in ASP.NET Core
- Create a Free Private NuGet Server with Continuous Deployment using VSTS
Subscribe
Sign up below and never miss a new article